Using Node-RED to capture Dash Button press
With the release of Home Assistant version 0.70 it is now possible to install the Dasher add-on again when running Hass.io on Ubuntu Server.
If, like me, you are frustrated by the inability to install certain add-ons in the latest versions of Hass.io running on a generic Linux Server, you must be looking for alternatives.
One of the add-ons I was missing the most was Dasher because I use Dash Buttons to control some scenes in my house.
As I do not have the patience to wait for the next versions of Hass.io the add-on (which may or may not solve the problem) I started searching and found Amazon Dash Button with Node-RED built-in nodes.
This article explains everything textually so I decided to prepare something more visual to make it easier to understand it.
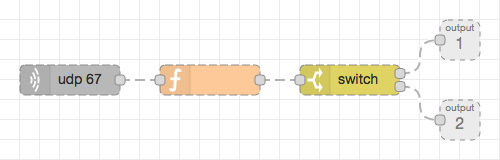
Based on what’s written there I created the following subflow.
1
2
3
4
5
6
7
8
9
10
11
12
13
14
15
16
17
18
19
20
21
22
23
24
25
26
27
28
29
30
31
32
33
34
35
36
37
38
39
40
41
42
43
44
45
46
47
48
49
50
51
52
53
54
55
56
57
58
59
60
61
62
63
64
65
66
67
68
69
70
71
72
73
74
75
76
77
78
79
80
81
82
83
84
85
86
87
88
89
90
91
92
93
94
95
[
    {
        "id": "27274ec0.477d32",
        "type": "subflow",
        "name": "Dash Button Press",
        "info": "",
        "in": [],
        "out": [
            {
                "x": 460,
                "y": 40,
                "wires": [
                    {
                        "id": "4d2c0a32.de2794",
                        "port": 0
                    }
                ]
            },
            {
                "x": 460,
                "y": 120,
                "wires": [
                    {
                        "id": "4d2c0a32.de2794",
                        "port": 1
                    }
                ]
            }
        ]
    },
    {
        "id": "10f156e0.c68be9",
        "type": "udp in",
        "z": "27274ec0.477d32",
        "name": "",
        "iface": "",
        "port": "67",
        "ipv": "udp4",
        "multicast": "false",
        "group": "",
        "datatype": "buffer",
        "x": 70,
        "y": 80,
        "wires": [
            [
                "94bc49a4.4eb12"
            ]
        ]
    },
    {
        "id": "94bc49a4.4eb12",
        "type": "function",
        "z": "27274ec0.477d32",
        "name": "",
        "func": "var mac = Buffer.alloc(6);\nmsg.payload.copy(mac, targetStart=0, sourceStart=28, sourceEnd=34);\nmsg.mac = mac.toString('hex');\nreturn msg;",
        "outputs": 1,
        "noerr": 0,
        "x": 210,
        "y": 80,
        "wires": [
            [
                "4d2c0a32.de2794"
            ]
        ]
    },
    {
        "id": "4d2c0a32.de2794",
        "type": "switch",
        "z": "27274ec0.477d32",
        "name": "",
        "property": "mac",
        "propertyType": "msg",
        "rules": [
            {
                "t": "eq",
                "v": "78e103b8b5c8",
                "vt": "str"
            },
            {
                "t": "eq",
                "v": "78e1031a7c50",
                "vt": "str"
            }
        ],
        "checkall": "false",
        "repair": false,
        "outputs": 2,
        "x": 350,
        "y": 80,
        "wires": [
            [],
            []
        ]
    }
]
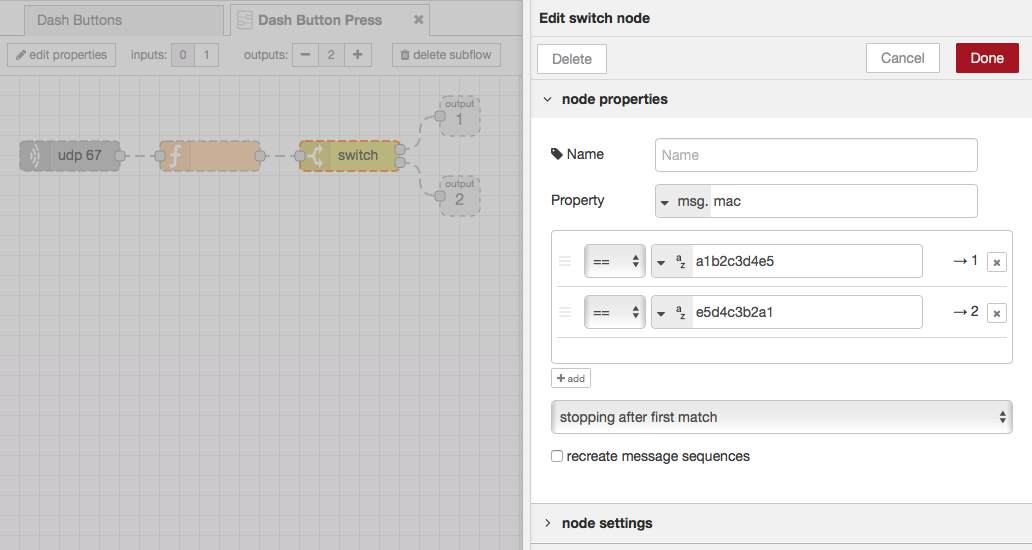
The switch node has two outputs, one for each one of the buttons I use. You’ll need to have as many outputs as the quantity of buttons you want to use.
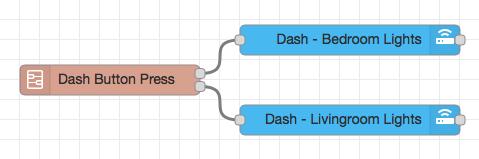
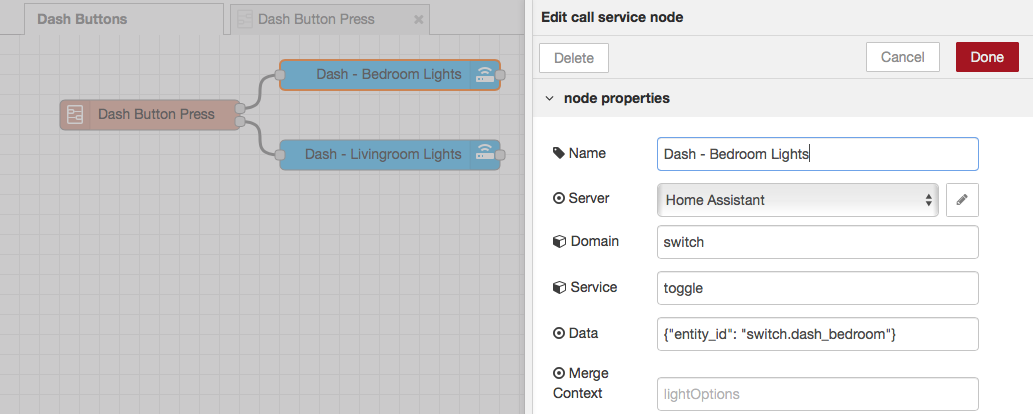
After that I just created the following flow connecting each output to its respective node and deploy the flows.
If you’re curious, these are the switches I currently use.
1
2
3
4
5
6
7
8
9
10
11
switch:
  - platform: template
    switches:
      dash_bedroom:
        value_template: "{{ is_state('light.bedroom_lights', 'on') }}"
        turn_on:
          service: script.turn_on
          entity_id: script.good_morning
        turn_off:
          service: script.turn_on
          entity_id: script.good_night

1
2
3
4
5
6
7
8
9
10
11
switch:
  - platform: template
    switches:
      living_room_lights:
        value_template: "{{ is_state('light.living_room_lights', 'on') }}"
        turn_on:
          service: script.turn_on
          entity_id: script.turn_on_1s
        turn_off:
          service: script.turn_on
          entity_id: script.turn_off_1s
The best thing about this is that it seems to work faster than with the add-ons in Home Assistant.