Track battery levels with Home Assistant and Custom UI
The States UI is now deprecated and will be completely removed from Home Assistant in version 0.107.0. Therefore, this won’t work anymore after that.
If you have sensors around the house, you should be concerned about the battery life of these sensors. Unless they are hard wired, of course. 🙂
I was reading this example from the Home Assistant Cookbook and started to think “why not change the colors of the entities according to their battery level?”.
It turns out that there is no way to color entities only with Home Assistant, for that we will have to use Custom UI. Its installation is quite simple, just follow one of the procedures described in documentation.
I chose to install it manually and activated using the code below like described in the Activating section of the documentation.
1
2
customizer:
  custom_ui: local
Then it was time to have fun with the YAML files.
1
2
3
4
5
6
7
8
frontend:
  themes:
    alert_yellow:
      primary-text-color: '#FFC000'
      paper-item-icon-color: '#FFC000'
    alert_red:
      primary-text-color: '#FF0000'
      paper-item-icon-color: '#FF0000'
First I created two themes, alert_yellow and alert_red. Each of them define the colors for the text (name and state) and for the icon of a given entity.
1
2
3
4
5
6
7
8
9
10
11
12
13
14
15
16
17
18
19
20
21
22
23
24
25
26
27
28
29
sensor:
  - platform: template
    sensors:
      window_sensor_battery_level:
        unit_of_measurement: '%'
        value_template: '{{ states.input_number.window_sensor_battery.state|int }}'
        icon_template: >
          {% set battery_level = states.sensor.window_sensor_battery_level.state|default(0)|int %}
          {% set battery_round = (battery_level / 10) |int * 10 %}
          {% if battery_round >= 100 %}
            mdi:battery
          {% elif battery_round > 0 %}
            mdi:battery-{{ battery_round }}
          {% else %}
            mdi:battery-alert
          {% endif %}
      door_sensor_battery_level:
        unit_of_measurement: '%'
        value_template: '{{ states.input_number.door_sensor_battery.state|int }}'
        icon_template: >
          {% set battery_level = states.sensor.door_sensor_battery_level.state|default(0)|int %}
          {% set battery_round = (battery_level / 10) |int * 10 %}
          {% if battery_round >= 100 %}
            mdi:battery
          {% elif battery_round > 0 %}
            mdi:battery-{{ battery_round }}
          {% else %}
            mdi:battery-alert
          {% endif %}
Then created the sensors using the icon_template code found in the Cookbook to show the icon corresponding to each battery level.
I used two input_number to simulate the battery charge values of each sensor.
1
2
3
4
5
6
7
8
9
10
11
12
13
14
15
16
17
18
19
20
21
customize:
  sensor.window_sensor_battery_level:
    custom_ui_state_card: state-card-custom-ui
    friendly_name: "Window Sensor Battery Level"
    templates:
      theme: >
        if (state < 20) {
          return 'alert_red';
        } else if (state < 40) {
          return 'alert_yellow';
        }
  sensor.door_sensor_battery_level:
    custom_ui_state_card: state-card-custom-ui
    friendly_name: "Door Sensor Battery Level"
    templates:
      theme: >
        if (state < 20) {
          return 'alert_red';
        } else if (state < 40) {
          return 'alert_yellow';
        }
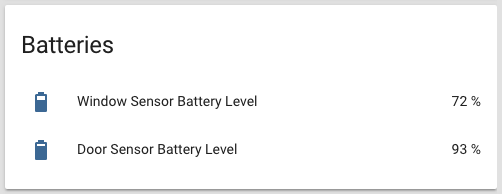
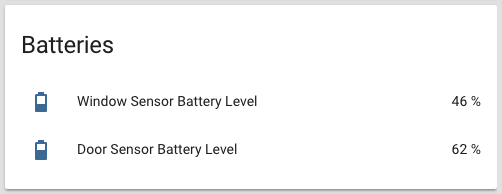
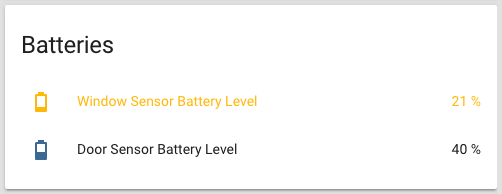
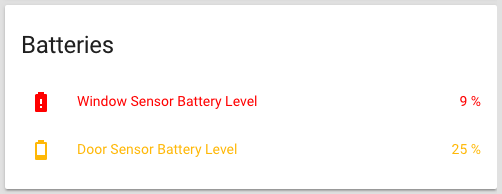
And finally I customized each sensor. If the battery charge is below 40% the sensor will be displayed in yellow and if it’s below 20% it will be displayed in red. If the values are 40% and above the sensor will be displayed using the colors defined in the theme used at that moment.
Here are some samples of the output.
Using this with a good notification system will help prevent a sensor from stop responding due to a discharged battery. Additionally, this will give you the possibility to choose the best time to change each battery and minimize the risk of discarding batteries that can still be used for some time.
Unfortunately this is not working with Safari 11.1 on MacOS High Sierra, I had to use Chrome.